
Lightyear Frontier Guide: Farm Setup to Automation
Use this Lightyear Frontier guide to choose a farm site, grow alien crops, upgrade your mech, and build an automated homestead in the full 1.0 release.
Jump to
Your farm’s growth depends on more than how many seeds you plant. This Lightyear Frontier guide walks you through choosing a location, establishing crop production, upgrading your mech, and reaching automation without burying yourself in manual work. The 1.0 release changes delivery requirements, tool upgrades, and automation, so build around its progression from the start.
How to Start in Lightyear Frontier 1.0
Establish a small working farm, preserve crops for seed production, and use deliveries to unlock more capable equipment. Expanding fields becomes much easier once your tools and processing machines can handle the extra harvest.
For a new farm, work through these priorities:
- Recover your mech and follow the tutorial missions. Mission markers highlight relevant resources and Constructs.
- Gather crops while exploring. Keep some for propagation rather than committing everything to deliveries or processing.
- Choose a site with room to expand. Consider nearby water, minerals, and access to neighboring regions.
- Build your Farm Center, sleeping space, storage, and processing machines.
- Check the Delivery Cannon’s current requirements and rewards. Complete deliveries while maintaining seed stock.
- Work toward Milestone 4, where automation begins in 1.0.
Choose your difficulty preset before settling into a routine. Creative, Relaxed, Balanced, and Challenging offer different starting configurations, while custom settings let you adjust factors including day length, growth time, crafting time, item weight, and fuel consumption.
Official page: Lightyear Frontier (lightyearfrontier.com)
Find a Farm Site Near Useful Resources
The crossroads between Outset Grasslands, Hexagon Valley, and Frost Peak Ridge offers access to several resource areas without committing your farm to the starting location. Look for the large field downhill from the mountain approach, with the neighboring regions within reach.

Leave open space around your Farm Center for fields, covered workshops, storage, and future pipe connections. Use Planning Mode to place building holograms without automatically contributing materials.
Gather Crops Along the Way
Turn the journey into a collection run:
- Explore the forest near the starting lake for carrots and pond pitcher plants.
- Return toward the crashed ship and gather the available wheat.
- Follow the river upstream, collecting crops and minerals along the route.
- Explore the mountain approach before heading downhill toward the crossroads.
- Search Hexagon Valley for additional crops, including Zapper Twig near water.
Plant pond pitcher sprouts early so they can grow into a water supply near your farm. Keep irrigation access in mind while laying out fields instead of filling every convenient space with crops immediately.
Use the Resource Scanner in the map menu when looking for materials. Add named Stamps to resource locations you expect to revisit, especially mineral deposits near your workshop.
Build a Covered Processing Area
Start with an Assembler, an Oil Presser, and a Seed Extractor. Together, they let you turn gathered materials and crops into construction components, oils, and additional seeds.

Place crafting machines beneath a supported roof and check their efficiency indicators. Shelter provides an efficiency benefit, and 1.0 simplifies the roof check used to determine whether a machine qualifies.
A compact workshop keeps the early production cycle manageable:
- Feed crops into the Seed Extractor to expand your planting stock.
- Process the crops needed for oils and crafting.
- Make components for your next available mech upgrades.
- Store spare materials close to the machines that use them.
Add another Seed Extractor when seed processing begins holding up planting. Match field expansion to how quickly you can produce seeds, plant them, and manage the harvest.
When the Sawmill and Mineral Crusher become available, use them to process large logs and mineral pieces for increased resource yield. Leave room around these machines to carry bulky objects into position.
Check the current milestone rewards before planning a construction sequence. The 1.0 overhaul moves several unlocks, including the Flower Press to Milestone 5.
Grow Your Seed Supply and Use Crop Rotation
Your early harvest has competing uses: deliveries advance progression, oils support crafting, and seed extraction supports future planting. Divide crops between those jobs rather than sending every available item through the same machine.
 Image: Steam / FRAME BREAK
Keep an initial planting stock for each crop you discover. Once those crops are growing, direct additional production toward the delivery or upgrade you are pursuing.
Use separate patches for different crops while learning their soil interactions. This makes the mound indicators easier to read and gives you a clearer picture of what changes after each harvest.
Read the Soil Indicators Before Replanting
Crop rotation rewards planning, and 1.0 improves the HUD information used to track it. Use the displayed crop and soil information when choosing your next planting rather than automatically repeating the same crop.
The update also distinguishes two soil treatments:
- Mulch changes mound type.
- Fertilizer provides a yield bonus, with new fertilizer options appearing in later milestones.
Use Mulch when you need to change a plot’s soil type. Apply yield-boosting Fertilizer when your goal is more produce from the planted area.
Use Rain and Seed Shooter Upgrades
Rain waters exposed plots, making it a useful opportunity to prepare and plant more ground. In 1.0, weather changes during the day, so finish planting while conditions help and check the water markers afterward.
Upgrading the Seed Shooter unlocks Seed Stacking, which lets you plant additional seeds into the same mound for a yield bonus. Keep enough seeds for your planned fields before committing extras to stacking.
For larger operations, the Seed Minigun Mod provides rapid planting. Pair increased planting capacity with enough seed production to keep it supplied.
Upgrade Your Mech Around the Work Ahead
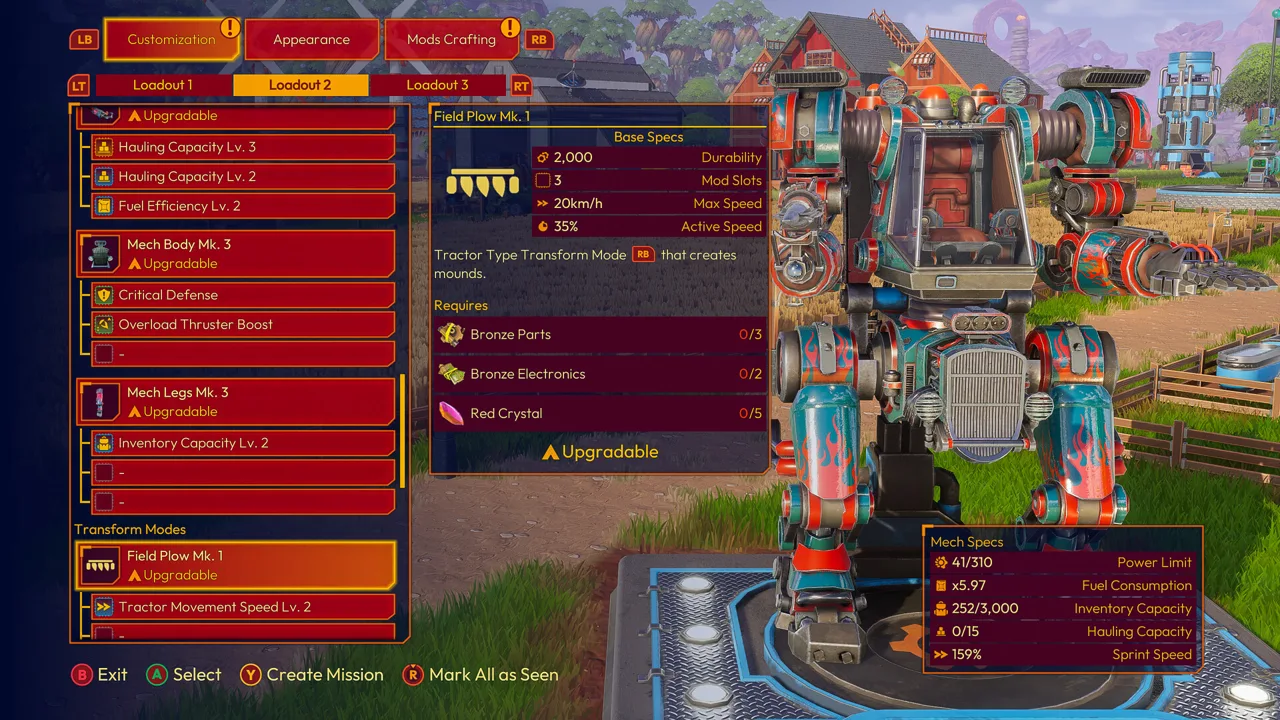
In 1.0, Tools, Parts, and Transform Modes have dedicated upgrade paths. Improve them through the customization menu rather than following older instructions that require crafting and equipping each separate tier.
Tool secondary abilities unlock with the tool’s first upgrade. Tools, Parts, and Modes no longer consume Mech Power, leaving more Energy available for Mods.
Choose upgrades around the task currently slowing your farm:
| Equipment | What it handles |
|---|---|
| Seed Shooter | Planting crop seeds |
| Irrigation Hose | Watering fields; its Hydro Blast secondary covers a rectangular area |
| Sprout Cannon | Planting sprouts, with a hologram preview of the plant |
| Resource Vacuum | Gathering loose resources |
| Field Plow | Preparing larger areas for planting |
Unlock the Field Plow when manual tilling becomes a bottleneck. Leave clear routes through your fields so you can use Transform Modes without repeatedly navigating around buildings.
During resource gathering, aim the Spike Saw at Weak Points for a 25% damage bonus. Upgrade your legs as you develop the mech; leg upgrades improve stability, while broken legs make it more prone to falling.
Keep an eye on fuel even if the mech can still move. Running out applies a scaling stat penalty, and the world’s settings include an option governing whether an empty tank disables the mech.
Start Automation at Milestone 4
Automation begins at Milestone 4 in 1.0. Automation Pipes replace Automators and can move resources directly from compatible storage into crafting Constructs.
Begin with a production chain you already use regularly:
- Select storage with an Output.
- Connect it to a crafting Construct using Automation Pipes.
- Supply the ingredients for the recipe you want to automate.
- Configure Auto Craft.
- Add connected output storage where needed.
- Check that ingredients move and finished items reach their destination.
Storage Box II, Silos, the Small Shed, and the Storage Shed are among the Constructs with Outputs. Check connection points before arranging a workshop around a particular container.
Configure Filters Before Mixing Supplies
Storage’s Resource Filter tab lets you accept or deny discovered items. Use those filters to direct ingredients and finished products into their intended storage.
A denied item cannot enter that storage through pipes or adjacent pickups, and attempting to place it manually produces a warning. Configure filters before feeding mixed supplies into a connected system.
A crafting Construct can cycle through up to three Auto Craft recipes, skipping recipes whose ingredients are unavailable. Use this when one machine needs to handle several recurring jobs.
Start with a single functioning chain, then expand it. Leaving access to storage Outputs and machine connection points makes later changes easier to plan.
Manage Weather, Storage, and Recovery
Days transition seamlessly in 1.0, and weather can change before the day ends. Check the Weather Forecaster for changes measured in hours when planning fieldwork or exploration.
Thunderstorms introduce lightning that can damage players and objects. Watch conditions while working outside, especially when you are also managing damaged equipment.
Tornadoes deal less damage than before and no longer chase you. Trailers also have more stable movement, though leaving enough room to maneuver still helps when hauling resources through a developed farm.
Storage capacities and most item weights increase tenfold in 1.0, while crops retain their previous weight. Crops therefore occupy one-tenth as much storage space relative to capacity as before. Use that extra room to hold planting stock alongside delivery crops.
If you lose a Trailer or inventory Cache, Lola’s Retrieval Service can return it to the nearest Farm Center for a fee that scales with its contents.
Home improvements can also support daily work. The Homestead Swiftness Coziness buff increases Exofarmer movement speed by 50% inside a Home Area, while Eco Driving reduces mech fuel consumption by 20%.
Progress Through Colonies and Neighbor Missions
Deliveries connect your growing farm to milestone progression and the colonies. The 1.0 Delivery Cannon menu lets you queue multiple deliveries and launch them in the same sequence, reducing repeated menu work.
Before launching, compare the requested crops with what you need for seeds and crafting. Keep your farm supplied while working toward the next reward.
Continue Ulf’s and Diane’s missions alongside colony deliveries:
- Ulf’s questline provides Seed Splicer Mk. 2 and Mk. 3, along with Giant tree sprouts.
- Diane’s questline unlocks ranch animal breeding.
- Prometheus Station Research Deliveries award blueprints for unique mech Mods.
Sandswept Highlands and Hollow Marsh are accessible from the start, but both are late-game regions. Develop your production and equipment before making them the focus of your expansion.
To begin the ending missions, bring all colonies to Thriving. Completing the main story still leaves you free to keep playing and developing your farm.
FAQ
Do I need to start a new save for 1.0?
No. Existing saves remain playable, and new achievements work with them. Starting fresh gives you the revised tutorial, balance, and progression from the beginning; an established farm can continue into the new content.
How many people can play together?
Up to three friends can join you on your farm. Shared Saves allow the farm to remain playable while the host is away.
Do Early Access owners need to buy the game again?
No. An existing Early Access copy updates to 1.0 without another purchase.
Continue with
 Lightyear Frontier Worth It? What 1.0 Adds for $29.99Is Lightyear Frontier worth it at $29.99? Explore the 1.0 story ending, expanded map, mech upgrades, automation, and co-op before you start your farm.
Continue exploring

Lightyear Frontier Best Mostly Flat Locations to Build
Looking for Lightyear Frontier best mostly flat locations to build? Find roomy farm sites, nearby resources, and practical layout tips for your next base.
Lightyear Frontier House: Building and Coziness Guide
Build your Lightyear Frontier house with a practical starter layout, roof support tips, Coziness buffs, and the kitchen and bathroom unlocks added in 1.0.
Join the community
Official channels for news, updates and player help: